Imagine a world where your food stays fresh up to five times longer, where freezer burn is a distant memory, and grocery waste becomes a thing of the past. Sounds like a dream, right? Not with a Foodsaver Vacuum Sealer Machine by your side. This kitchen powerhouse is designed to revolutionize how you store food, extending its shelf life, preserving its peak flavor and nutrients, and ultimately saving you time and money. If you’re tired of tossing out spoiled produce or freezer-burned meats, it’s time to unlock the full potential of vacuum sealing.
What is a FoodSaver Vacuum Sealer and Why Do You Need One?
At its core, a FoodSaver vacuum sealer machine is an appliance that removes air from specially designed bags and containers before sealing them airtight. Why is removing air so crucial? Oxygen is the primary culprit behind food spoilage, causing oxidation, freezer burn, and the growth of bacteria and mold. By eliminating oxygen, a FoodSaver system creates an environment where food can thrive, maintaining its quality and extending its freshness far beyond traditional storage methods.
Think about the sheer amount of food that gets wasted every year. Many households routinely throw away food that has gone bad prematurely. A FoodSaver vacuum sealer machine directly combats this problem, turning perishable goods into long-lasting provisions. It’s not just about saving money, though the savings can be substantial; it’s also about making the most of your culinary efforts and reducing your environmental footprint.
Popular FoodSaver Vacuum Sealer Models and How They Work
FoodSaver offers a range of vacuum sealer machines, each designed with varying features to suit different kitchen needs and lifestyles. From compact handheld units perfect for quick seals on zipper bags and containers to robust countertop models built for heavy-duty bulk sealing, there’s a FoodSaver vacuum sealer machine for everyone.
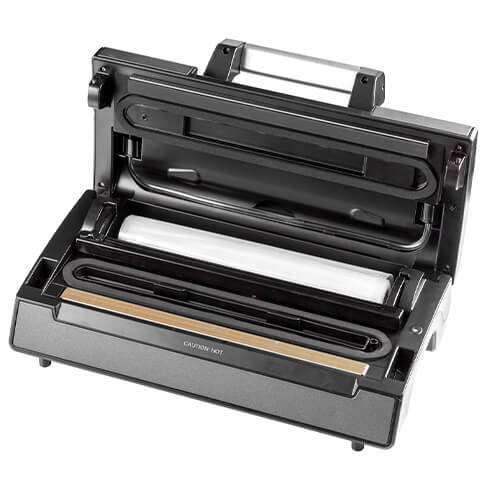
Countertop Models: These are the most common type, offering powerful vacuum suction and a heat-sealing bar. Many come with convenient features like built-in roll storage and a cutter, allowing you to create custom-sized bags from a roll. Advanced models often include settings for different food types (dry/moist), a pulse function for delicate items like baked goods or chips, and even marinate modes that infuse flavors in minutes.
Handheld Vacuum Sealers: Ideal for smaller tasks and fresh foods stored in specialized containers or zipper bags, these compact devices are often cordless and perfect for daily use, or for items that don’t require the intense vacuum of a main unit. Some FoodSaver vacuum sealer machine models even integrate a handheld sealer directly into the main unit for ultimate versatility, known as 2-in-1 systems.
How They Work: The basic principle remains the same across all FoodSaver vacuum sealer machines. You place the open end of a FoodSaver bag into the vacuum channel. The machine then draws out all the air, creating a vacuum. Once the air is removed, the heat-sealing bar activates, creating a strong, airtight seal. For specific items like liquids or very delicate foods, settings like “moist” or “pulse” give you greater control over the vacuum process, ensuring a perfect seal without crushing or drawing liquids into the machine. A removable drip tray is also a common feature, making cleanup a breeze, especially when dealing with marinades or moist foods.
A Step-by-Step Guide to Using Your FoodSaver Effectively
Getting started with your FoodSaver vacuum sealer machine is surprisingly simple. Follow these steps for optimal food preservation:
- Prepare Your Food: Always start with fresh food. For vegetables like broccoli or green beans, blanching them first can help retain their color and texture. For liquids, consider pre-freezing them into a solid block before sealing, or use a FoodSaver container. Pat dry any excess moisture from meats or produce to ensure a strong seal.
- Prepare Your Bag or Roll: If using a FoodSaver roll, open your machine, pull out the desired length, and use the built-in cutter to cut the bag. Then, place one end into the sealing area and press the “Seal” button to create a bottom seam. If using pre-cut bags, they are already sealed at one end.
- Fill the Bag: Place your food into the bag, leaving at least 3 inches of space from the top for the sealing process. This space is crucial for the machine to properly vacuum and seal without food interfering with the seal line.
- Position the Bag: Lay the open end of the bag flat into the vacuum channel of your FoodSaver vacuum sealer machine. Ensure there are no wrinkles or creases that could compromise the airtight seal.
- Close and Lock the Lid: Firmly close the lid of your FoodSaver. Depending on your model, you might need to press down on both sides or engage a locking latch.
- Select Settings (If Applicable): If your machine has “Dry” and “Moist” settings, select the appropriate one for your food. The “Moist” setting ensures a stronger seal for foods with some liquid content. For delicate items, use the “Pulse” setting to control the vacuum manually.
- Press Vacuum & Seal: Initiate the vacuum and seal cycle. The machine will begin to remove air, and once a vacuum is achieved, it will automatically activate the heat seal.
- Check the Seal: Once the process is complete, open the lid and remove your bag. Always inspect the seal to ensure it’s straight, clean, and fully airtight. If you see any gaps, simply cut below the old seal and reseal.
- Label and Store: Don’t forget to label your vacuum-sealed items with the contents and date! This will save you guesswork later. Store them in your pantry, refrigerator, or freezer as appropriate.
Smart Tips for Food Preservation and Common Pitfalls to Avoid
Maximizing the use of your FoodSaver vacuum sealer machine involves a few smart tricks and an awareness of common mistakes:
Tips for Success:
- Speedy Marinating: A FoodSaver vacuum sealer can significantly cut down marinating time. By removing air, the vacuum opens the pores of meat or other foods, allowing marinades to penetrate much faster – often in just 30 minutes instead of hours.
- Portion Control: Vacuum seal individual servings of meals or ingredients for easy grab-and-go options. This is fantastic for meal prepping and controlling portion sizes.
- Beyond Food: Your FoodSaver isn’t just for food! Use it to protect important documents, silver from tarnishing, or even holiday decorations from dust and moisture, making storage a breeze.
- Blanching Vegetables: For many vegetables, a quick blanch before vacuum sealing and freezing helps preserve their color, flavor, and nutrients.
- Using Accessories: Don’t forget FoodSaver’s range of accessories like jar sealers, container sets, and bottle stoppers. These expand the versatility of your vacuum sealer machine, allowing you to seal mason jars for dry goods or keep wine fresh.
Pitfalls to Avoid:
- Overfilling Bags: Always leave enough space at the top of the bag for a clean seal. Trying to squeeze too much in is a common cause of seal failures.
- Wet Sealing Area: Ensure the inside of the bag opening and the vacuum channel are dry. Moisture can prevent a strong, airtight seal.
- Freezing Hot Foods: Always cool cooked food completely before vacuum sealing to prevent condensation inside the bag, which can lead to bacterial growth.
- Sharp Edges: When sealing items with sharp edges (like bones in meat), use a paper towel or foil to cushion the sharp point to prevent puncturing the bag.
“A FoodSaver vacuum sealer machine is more than just a gadget; it’s an investment in your kitchen’s efficiency and your family’s health,” says Chef Isabella Rossi, a renowned food preservation expert. “By reducing waste and maintaining peak freshness, you’re not only saving money but also enjoying the true quality of your ingredients.”
The Transformative Benefits of Vacuum Sealing
The advantages of owning a FoodSaver vacuum sealer machine extend far beyond simply keeping food fresh. Here’s how it transforms your food management:
- Extended Shelf Life: This is the most significant benefit. Vacuum sealing removes oxygen, which drastically slows down spoilage. Meats can last 2-3 years in the freezer (compared to 6 months traditionally), hard cheeses can stay fresh for 4-8 months in the fridge (instead of 1-2 weeks), and pantry staples like flour and sugar can last up to 2 years.
- Reduced Food Waste and Cost Savings: By extending freshness, you throw away less food. This means you can confidently buy in bulk when items are on sale, knowing you can preserve them for later use. Over time, these savings add up significantly.
- Prevention of Freezer Burn: Freezer burn occurs when food is exposed to air, causing moisture loss and flavor degradation. A FoodSaver vacuum sealer machine creates an airtight barrier, preventing this common freezer foe and ensuring your frozen foods taste as good as the day you sealed them.
- Retained Flavor, Texture, and Nutrients: By minimizing exposure to air and moisture, vacuum-sealed food locks in its natural flavors, textures, and vital nutrients, providing a better eating experience.
- Optimal for Sous Vide Cooking: Vacuum sealing is essential for sous vide cooking, where food is cooked in a precisely controlled water bath. The vacuum seal ensures even cooking and prevents water from entering the bag.
- Enhanced Organization: Vacuum-sealed bags are flat and stackable, freeing up valuable space in your freezer, fridge, and pantry. This makes organizing your food much easier and helps you quickly find what you need.
- Chemical-Free Preservation: Unlike some other preservation methods, vacuum sealing doesn’t require any chemicals or additives, keeping your food pure and natural.
FoodSaver Applications in Your Home
The versatility of a FoodSaver vacuum sealer machine makes it indispensable for various household needs:
- Meal Preparation: Cook large batches of your favorite meals, portion them out, and vacuum seal them for quick, healthy dinners throughout the week or month.
- Bulk Buying: Take advantage of sales at your local grocery store or warehouse club. Divide large quantities of meat, poultry, or produce into smaller, vacuum-sealed portions for long-term storage.
- Seasonal Produce: Preserve the bounty of your garden or local farmer’s market. Vacuum seal fresh berries, vegetables, or herbs to enjoy them out of season.
- Leftovers: Don’t let delicious leftovers go to waste. Vacuum seal them to maintain their freshness and flavor, making them perfect for lunch the next day or a convenient future meal.
- Dry Goods: Extend the life of coffee beans, pasta, rice, nuts, and spices by vacuum sealing them in bags or canisters.
Frequently Asked Questions (FAQ)
What types of food can I vacuum seal with my FoodSaver?
You can vacuum seal a vast array of foods, including meats, poultry, fish, fruits, vegetables (especially after blanching), dry goods like grains, pasta, and coffee, and even soft foods and liquids using specific techniques or containers.
Can I vacuum seal liquids with a FoodSaver vacuum sealer machine?
Yes, you can. For soups, sauces, or marinades, it’s best to pre-freeze them in a container until solid before placing them in a FoodSaver bag and vacuum sealing. Alternatively, many FoodSaver models have a “Moist” setting or you can use FoodSaver liquid-blocking bags or containers designed for liquids.
How long does vacuum-sealed food last?
Generally, vacuum-sealed food can last up to five times longer than food stored conventionally. For instance, fresh meat can last 2-3 years in the freezer, hard cheese for several months in the fridge, and dry goods for years in the pantry. Specific times vary by food type and storage conditions.
How do I clean my FoodSaver vacuum sealer machine?
Cleaning is straightforward. Always unplug the unit first. Wipe down the exterior with a damp cloth. For models with a removable drip tray, simply remove it and wash it with warm, soapy water. Ensure all parts are completely dry before reassembling and storing.
What’s the difference between FoodSaver bags and rolls?
FoodSaver bags are pre-cut to standard sizes and sealed on three sides, ready for immediate use. Rolls allow you to create custom-sized bags, which is ideal for larger items or to minimize bag waste when sealing smaller portions. Both are durable, freezer-safe, and microwave-safe.
Embrace the Freshness with Your FoodSaver
The FoodSaver vacuum sealer machine is more than just a kitchen appliance; it’s a game-changer for anyone serious about food preservation, reducing waste, and enjoying fresher, healthier meals. By investing in this technology, you’re investing in a smarter, more sustainable way of living and eating. From preventing freezer burn to extending the life of your bulk purchases, a FoodSaver system empowers you to take control of your food. So, go ahead, explore the possibilities, and discover the incredible difference a FoodSaver vacuum sealer machine can make in your culinary world. Your pantry, fridge, and taste buds will thank you.