Imagine a world where your groceries last dramatically longer, your freezer is free from icy burn, and meal prep becomes a breeze. This isn’t a kitchen dream, it’s the reality a quality vacuum sealer can offer, and the Bonsenkitchen Vacuum Sealer has emerged as a popular, accessible choice for many home cooks. If you’re looking to elevate your food preservation game, reduce waste, and save money, understanding how to harness the power of this handy appliance is your next step.
What Exactly is a Bonsenkitchen Vacuum Sealer?
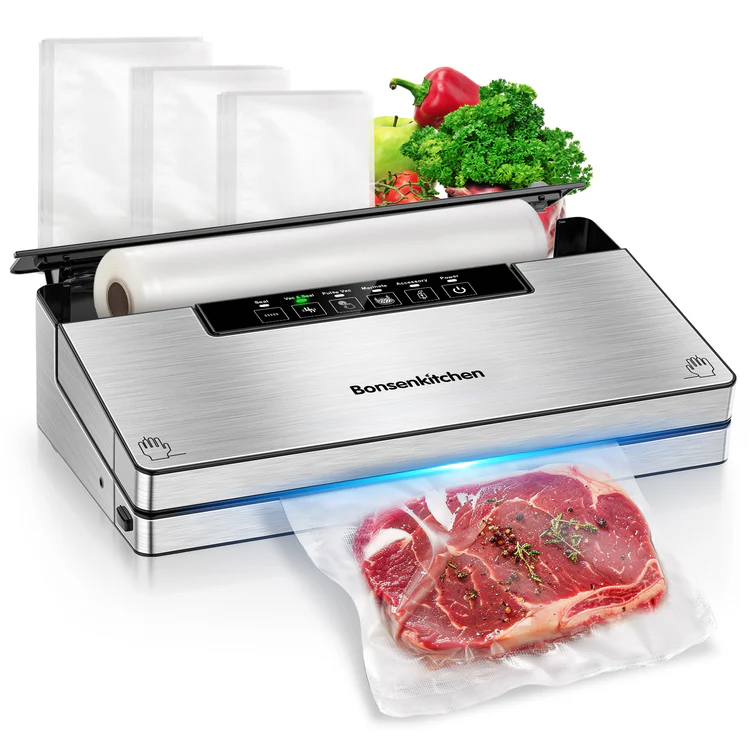
At its core, a Bonsenkitchen vacuum sealer is a kitchen appliance designed to remove air from specially designed bags or containers before sealing them. Why remove air? Because oxygen is the primary culprit behind food spoilage, freezer burn, and loss of flavor and nutrients. By creating an airtight seal, a Bonsenkitchen vacuum sealer extends the freshness of your food significantly, often up to five times longer than traditional storage methods.
Bonsenkitchen sealers are known for striking a balance between functionality and affordability, making advanced food preservation accessible to a wider audience. They are often praised for their user-friendly design, proving that you don’t need a professional chef’s salary to enjoy the benefits of vacuum sealing at home.
Diving Deeper: How Bonsenkitchen Vacuum Sealers Work and Their Key Features
Bonsenkitchen vacuum sealers operate on a straightforward principle: they evacuate air and then apply heat to create a strong, hermetic seal. While the exact features can vary slightly between models like the popular VS2100 or VS3201, several core functionalities make these machines versatile kitchen companions.
One of the standout features is the Dual-Mode Sealing capability, offering distinct settings for “Dry” and “Moist” foods. The “Dry” mode is perfect for solid items like nuts, grains, cheeses, and dehydrated fruits, ensuring all air is removed without impacting texture. The “Moist” mode, on the other hand, is specifically engineered for foods with some liquid content, such as raw meats, marinated dishes, or blanched vegetables, often employing a more controlled vacuum and sealing process to prevent moisture from interfering with the seal.
For delicate items, the Pulse Vac Mode is a true game-changer. Instead of an automatic, full-power vacuum, this mode allows you to manually control the vacuum intensity. You simply press and hold the “Pulse Vac” button, observe the air being removed, and release it when you’ve reached your desired vacuum level—just before your delicate bread gets squashed or your soft berries lose their shape. After achieving the perfect vacuum, you manually press the “Seal” button to finish the job.
Need to reseal a bag of chips or create a custom-sized bag from a roll? The Seal Only Mode is your go-to. This function applies heat to create a seal without activating the vacuum pump, making it incredibly handy for everyday kitchen tasks beyond full vacuum sealing. Many Bonsenkitchen models also include a built-in cutter and roll storage, allowing you to effortlessly create custom-sized bags from a roll, minimizing waste and maximizing convenience.
“The beauty of modern vacuum sealers like those from Bonsenkitchen lies in their intuitive design,” notes Dr. Evelyn Reed, a leading food science and preservation expert. “Features like the Pulse Vac mode empower home cooks to confidently preserve a wider range of foods, from the most robust cuts of meat to the most delicate herbs, without specialized training.”
Beyond bags, many Bonsenkitchen vacuum sealers come equipped with an external vacuum system and an air suction hose. This allows you to vacuum seal rigid containers, such as mason jars or specialized canisters, which is fantastic for preserving pantry staples, pickling vegetables, or marinating meats in a fraction of the time. Finally, the practical design often includes a detachable drip tray for easy cleaning and maintenance, ensuring hygiene and prolonging the life of your appliance. Many users also appreciate their quiet operation, which means you won’t be rattling the entire house during your meal prep sessions.
Mastering Your Bonsenkitchen Vacuum Sealer: A Step-by-Step Guide
Getting the most out of your Bonsenkitchen vacuum sealer is simple once you understand the basic steps.
- Prepare Your Food and Bag:
- Place your food into a vacuum sealer bag, leaving at least 2-3 inches of space between the food and the open end of the bag. This provides enough room for the sealing process.
- Ensure the open end of the bag is clean and dry. Any moisture or food particles can prevent a proper seal. For moist foods, you might pre-freeze them slightly or place a paper towel at the top of the bag to absorb excess liquid.
- Don’t overfill the bag; typically, two-thirds capacity is a good guideline to ensure effective vacuuming.
- Position the Bag:
- Open the lid of your Bonsenkitchen vacuum sealer.
- Place the open end of the vacuum bag flat into the vacuum chamber, ensuring it lies smoothly and covers the sealing strip without wrinkles. Make sure it’s fully within the drip tray area.
- Close and Lock the Lid:
- Firmly close the appliance lid until you hear two distinct “click” sounds on both sides. This indicates that the lid is securely locked and ready for operation. This step is crucial for a successful vacuum.
- Select Your Desired Mode:
- Press the “Power” button to turn on the machine.
- For most dry foods, press the “Vac & Seal” button for automatic vacuuming and sealing.
- For moist or delicate foods (like bread, berries, or highly marinated items), press and hold the “Pulse Vac” button. Release it once you’ve achieved your desired vacuum level, then press the “Seal” button to complete the process.
- If you just want to seal a bag without removing air (e.g., creating a custom bag from a roll or resealing a snack bag), simply position the bag and press the “Seal” button.
- Monitor and Complete:
- The machine will typically have indicator lights to show the progress of the vacuuming and sealing process.
- Once the process is complete and the indicator light turns off, you’ll hear a sound confirming the cycle is finished.
- Release and Remove:
- Press the release buttons on the sides of the machine to unlock the lid.
- Carefully remove your perfectly vacuum-sealed bag.
“Always ensure your bags are meticulously dry at the sealing point,” advises Dr. Evelyn Reed. “Even a tiny speck of moisture can compromise the seal, allowing air to creep back in and defeat the purpose of vacuum sealing.”
Unlocking the Benefits: Why Vacuum Sealing with Bonsenkitchen is a Game Changer
Investing in a Bonsenkitchen vacuum sealer isn’t just about another kitchen gadget; it’s about transforming your approach to food and home management.
- Extend Food Freshness Dramatically: This is the primary benefit. By removing oxygen, vacuum-sealed foods stay fresh 3 to 5 times longer than conventionally stored items. This means your produce, meats, and pantry staples maintain their quality for weeks or even months longer.
- Prevent Freezer Burn: Freezer burn occurs when food is exposed to air in the freezer, leading to dehydration and ice crystal formation. Vacuum sealing eliminates this exposure, preserving the taste, texture, and nutritional value of frozen foods.
- Reduce Food Waste: With extended shelf life, you’ll find yourself throwing away far less spoiled food. This translates directly into savings on your grocery bill and a more sustainable household.
- Enhance Meal Prep and Organization: Vacuum sealing allows you to portion out ingredients or entire meals, making meal planning effortless. Imagine having perfectly portioned chicken breasts or pre-marinated steaks ready to go from the freezer! It also keeps your fridge and freezer organized and clutter-free.
- Optimal for Sous Vide Cooking: For fans of sous vide, a vacuum sealer is indispensable. It creates the perfect environment for precise temperature cooking, locking in flavors and moisture for restaurant-quality results every time.
- Faster Marinating: Using an external vacuum canister with your Bonsenkitchen sealer can significantly speed up the marinating process. The vacuum opens the pores of the food, allowing marinades to penetrate deeper and faster, infusing flavor in minutes rather than hours.
“From an economic standpoint, a vacuum sealer pays for itself remarkably quickly,” Dr. Evelyn Reed points out. “The reduction in food waste alone, combined with the ability to buy in bulk and preserve seasonal produce, translates into substantial savings for any household.”
Tips, Tricks, and Common Pitfalls to Avoid
To ensure your Bonsenkitchen vacuum sealer operates at its best and your food stays perfectly preserved, keep these tips and warnings in mind:
Smart Tips for Success
- Pre-freeze Liquids and Soft Foods: For liquid-rich foods like soups or stews, or very soft items like ripe berries, pre-freeze them on a tray until solid or semi-solid before vacuum sealing. This prevents liquids from being drawn into the machine and keeps delicate items from being crushed.
- Cleanliness is Key: Regularly wipe down the sealing strip and vacuum chamber. Food debris or moisture can compromise the seal and potentially damage the machine. The detachable drip tray on many Bonsenkitchen models makes this especially easy.
- Label and Date: Always label your vacuum-sealed bags with the contents and the date sealed. This helps with inventory management and ensures you use food within its extended shelf life.
- Use the Right Bag Size: Don’t use a bag that’s too large for the contents, as it wastes material and can make the vacuum process less efficient. Utilize the built-in cutter to customize bag sizes from a roll.
- Allow for Cooling: If you’re doing a lot of sealing in one session, give your Bonsenkitchen vacuum sealer a short break (around 20 seconds between seals) to prevent overheating of the sealing strip, especially during heavy usage.
Common Pitfalls to Avoid
- Overfilling Bags: Trying to cram too much food into a bag will not only make it difficult to get a good vacuum but can also prevent a proper seal. Always leave ample space at the top.
- Wet Bag Openings: This is a major cause of seal failure. Even a tiny bit of moisture can prevent the heat seal from adhering properly. Pat the bag opening dry or fold a paper towel inside the top edge for moist foods.
- Not Locking the Lid Properly: If you don’t hear those satisfying “clicks” when closing the lid, your machine won’t pull a vacuum. Always ensure both sides are securely latched.
- Sealing Sharp Objects: Bones, crusty bread, or even rigid pasta can pierce the vacuum bag, leading to air leaks. Wrap sharp edges in a paper towel or foil before sealing.
- Ignoring Troubleshooting: If your Bonsenkitchen vacuum sealer isn’t performing as expected (e.g., poor suction, no seal), check the manual for common troubleshooting steps. Often, it’s a simple fix like repositioning the bag, cleaning the sealing strip, or ensuring the gaskets are correctly installed.
Choosing the Right Bonsenkitchen Vacuum Sealer: What to Consider
While Bonsenkitchen offers a range of models, consider these factors when making your choice:
- Your Budget and Usage: Bonsenkitchen is generally budget-friendly, but higher-end models may offer more features. If you’re a casual user, a basic model is sufficient. For frequent bulk sealing or sous vide, you might appreciate extra power or continuous sealing capabilities.
- Suction Power: While some Bonsenkitchen models are considered entry-level, they are effective for general household use. If you prioritize very high suction for challenging items or commercial-level sealing, you might compare specifications across different models.
- Size and Storage: Consider your kitchen space. Bonsenkitchen models are often praised for their compact design, making them easy to store in drawers or cabinets when not in use.
- Included Accessories: Check if the model comes with a starter pack of bags, an air suction hose for canisters, or other useful attachments that align with your needs.
Frequently Asked Questions (FAQ)
Can I use any bags with my Bonsenkitchen vacuum sealer?
Generally, Bonsenkitchen vacuum sealers are designed to work with embossed vacuum sealer bags. These bags have a textured surface that allows air to be drawn out effectively. Using regular plastic bags will not work.
How do I clean my Bonsenkitchen vacuum sealer?
Cleaning is usually straightforward. Many models feature a removable drip tray that can be washed with warm, soapy water. The sealing strip and vacuum chamber should be wiped clean with a damp cloth and then dried thoroughly. Always ensure the machine is unplugged before cleaning.
Is a Bonsenkitchen vacuum sealer good for sous vide cooking?
Absolutely! Vacuum sealing creates the ideal airtight environment for sous vide cooking, allowing food to cook evenly and retain moisture and flavor. The Bonsenkitchen’s reliable seal makes it a great companion for this cooking method.
What does “Pulse Vac” do, and when should I use it?
“Pulse Vac” mode gives you manual control over the vacuum process. You press and hold the button to vacuum and release it when you’ve removed enough air. It’s ideal for delicate foods like bread, pastries, soft fruits, or moist items where you want to prevent crushing or drawing liquids into the machine before sealing.
How long does food last when vacuum sealed?
Vacuum sealing can extend the shelf life of food by three to five times compared to conventional storage. For example, fresh meat might last 1-2 days in the fridge but 6-9 days when vacuum sealed; in the freezer, it could last 6 months to a year without freezer burn, versus 2-3 months traditionally.
Conclusion
The Bonsenkitchen vacuum sealer is more than just a kitchen appliance; it’s a tool that empowers you to take control of your food, reduce waste, and simplify your meal preparation. Its user-friendly design and versatile features make it an excellent choice for anyone looking to embrace the benefits of vacuum sealing, whether you’re a seasoned meal prepper or just starting your journey into smarter food preservation. By understanding its functions and following a few simple guidelines, you’ll soon be enjoying fresher food, a more organized kitchen, and noticeable savings. So go ahead, give it a try—your taste buds and your wallet will thank you!