Imagine a world where your groceries stay fresh for weeks, leftovers are always delicious, and meal prepping is a breeze. This isn’t a kitchen dream; it’s the reality a high-quality Vacuum Sealer can bring to your home. This ingenious device is a game-changer for anyone looking to extend the life of their food, save money, and elevate their culinary game. Say goodbye to dreaded freezer burn and wasted produce – your journey to unparalleled food preservation begins right here.
What is a Vacuum Sealer and Why Does Every Kitchen Need One?
At its core, a vacuum sealer is a kitchen appliance designed to remove air from a storage bag or container and then create an airtight seal. Why is removing air so important? Air, specifically oxygen, is the primary culprit behind food spoilage. It causes oxidation, leading to discoloration, loss of nutrients, and the growth of mold and bacteria. By eliminating this oxygen-rich environment, a vacuum sealer dramatically slows down the decaying process, keeping your food fresher for significantly longer.
Think about it: have you ever bought a bulk pack of meat, only to have half of it succumb to freezer burn before you could use it? Or watched your vibrant berries turn mushy too soon? A vacuum sealer acts like a superhero shield, protecting your food from these common woes, ensuring that what you buy fresh stays fresh, and what you store retains its quality. It’s an investment that pays for itself by drastically cutting down on food waste.
Choosing the right vacuum sealer for your needs means considering a few things like the types of food you usually seal, how often you’ll use it, and your budget. From compact models perfect for occasional use to robust machines designed for heavy-duty preservation, there’s a vacuum sealer out there to fit every kitchen and lifestyle. Look for features like specific settings for moist or dry foods, built-in bag storage, and easy-to-clean drip trays to make your sealing experience as smooth as possible.
Demystifying Vacuum Sealer Types: Finding Your Perfect Match
Just like there’s a perfect pan for every dish, there’s a perfect vacuum sealer for every household. Understanding the different types available will help you make an informed choice that suits your culinary habits.
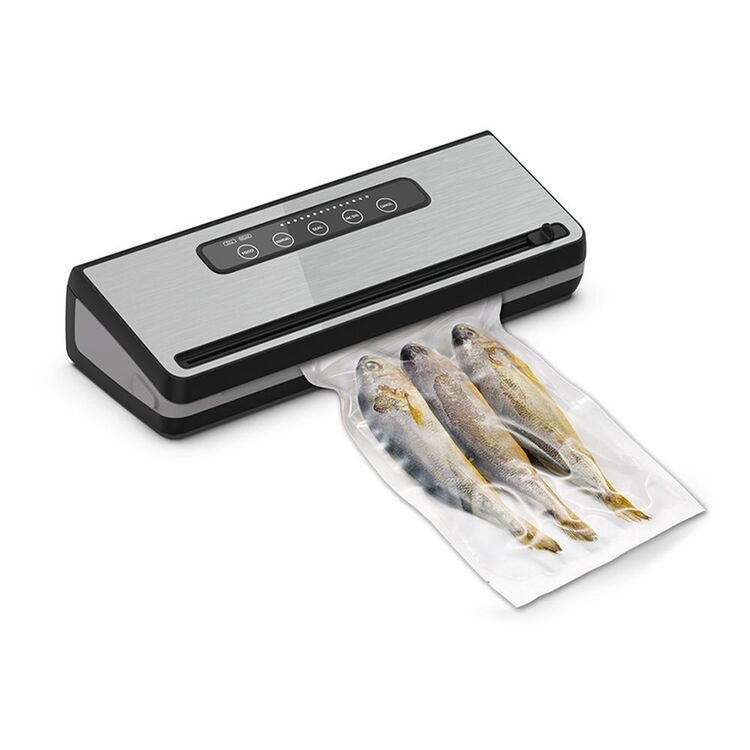
External (Out-of-Chamber) Vacuum Sealers
These are perhaps the most common type you’ll find in home kitchens. An external vacuum sealer works by placing the open end of a specially designed textured (embossed) bag into a vacuum channel on the machine. The sealer then sucks the air directly out of the bag before heat-sealing it shut.
- Pros: Generally more affordable and compact, making them ideal for smaller kitchens or occasional users. They excel at sealing dry or slightly moist solid foods like cuts of meat, cheese, or pantry staples.
- Cons: They aren’t the best choice for very wet foods or liquids, as the suction can draw liquids into the machine, which can ruin the seal or the device itself. They also require specific embossed bags, which can be a recurring cost.
Chamber Vacuum Sealers
If you’re serious about food preservation, especially if you deal with liquids or large quantities, a chamber vacuum sealer might be your best friend. With these machines, the entire bag (with the food inside) is placed into a chamber. The machine then evacuates all the air from the chamber itself before sealing the bag.
- Pros: Excellent for sealing liquids like soups, sauces, and marinades without fear of suction issues. They create a much stronger vacuum and can use smoother, often cheaper, bags. They are typically faster and more durable, built for frequent use.
- Cons: Chamber sealers are usually larger, heavier, and come with a higher price tag, making them more common in commercial settings but gaining popularity with avid home cooks.
Handheld Vacuum Sealers
For quick jobs, small portions, or specific vacuum-sealable containers, handheld vacuum sealers offer convenience and portability. These devices often use special zipper bags or containers with a valve.
- Pros: Highly compact, easy to store, and great for on-the-go freshness. They’re perfect for sealing snacks, deli meats, or extending the life of fresh produce in designated containers.
- Cons: They provide a lighter vacuum and are not suitable for bulk sealing or long-term freezer storage compared to their larger counterparts. Their applications are more limited.
Your Step-by-Step Guide to Effective Vacuum Sealing
Using a vacuum sealer effectively is simple, but a few key steps will ensure you get a perfect, long-lasting seal every time.
Preparation is Key
Before you even touch your vacuum sealer, preparing your food correctly is crucial.
- Clean and Dry: Always ensure your food is clean and, most importantly, dry. Any moisture, oils, or food particles on the sealing area of the bag can prevent a proper seal. Pat down meats, fish, and vegetables with a paper towel.
- Portioning: Divide your food into meal-sized portions. This makes meal prep easier and avoids having to open a large bag of food only to re-seal what you don’t use, potentially degrading its freshness.
- Pre-freezing Liquids/Moist Foods: For liquids like soups or highly moist foods, consider pre-freezing them slightly in their bags or containers before sealing. This prevents liquids from being drawn into the machine during the vacuuming process.
- Leave Adequate Space: Don’t overfill your bags! Leave at least 3 inches of space from the top of the bag for external sealers, and 2 inches for chamber sealers. This ensures enough room for the machine to create a strong, clean seal.
The Sealing Process
Once your food is prepped, the sealing itself is quick and straightforward.
- Choose the Right Bag/Roll: Use bags specifically designed for your vacuum sealer type. If using a roll, cut it to the desired length, leaving extra space for the seal and any potential re-seals.
- Position the Bag Correctly: Place the open end of the bag flat into the vacuum channel or chamber. Ensure there are no wrinkles or creases along the sealing area. A smooth surface is essential for an airtight seal.
- Close the Lid Securely: Close the lid of your vacuum sealer firmly. Many models have an audible click or indicator light when properly latched.
- Select Settings: If your machine has settings for “dry” or “moist” foods, select the appropriate one. The “moist” setting typically provides a slightly longer sealing time to account for any residual moisture.
- Activate Vacuum and Seal: Press the “Vacuum & Seal” button. The machine will begin to remove the air. Some machines automatically switch to sealing once the vacuum is complete; others may require a separate “Seal” button press.
- Wait for Cycle Completion: Allow the machine to finish its full cycle. Indicator lights will usually turn off when the process is done.
- Inspect and Label: After removing the bag, inspect the seal to ensure it’s complete and airtight. Finally, label your sealed food with the date and contents. This might seem minor, but it’s a huge time-saver when you’re rummaging through a freezer full of vacuum-sealed packages!
|
Our Picks for the Best Vacuum Sealer in 2026
As an Amazon Associate I earn from qualifying purchases.
|
||
| Num | Product | Action |
|---|---|---|
| 1 | Precision Food Vacuum Sealer Machine, POWOT Fully Automatic Vacuum Sealing System, Commercial Food Vacuum Saver Pro, Double Heat Seal, Easy-Lock Handle, Built-in Cutter&Bag Storage, Hose&Bag Rolls |

|
| 2 | MEGAWISE 2025 Powerful Vacuum Sealer Machine - Compact Design - One-Touch Automatic - Seal in 10-20 Seconds - Dry, Moist, Wet, and Cold Modes - With 10 Vacuum Bags & Built-in Cutter (Grey) |
|
| 3 | Nesco Deluxe Food VS-12 Vacuum Sealer, 130 Watts, Kit Bags & Viewing Lid, Compact, Silver |
|
| 4 | KITHELP Vacuum Sealer for Food, Food Saver Vacuum Sealer Machine + 30 Reusable Vacuum Bags, Compact Handheld Vacuum sealer for Preservation Chef and Home |
|
| 5 | Chef Preserve Compact Vacuum Sealer for Food (Vacuum Sealer Machine + 30 Reusable Vacuum Bags) Powerful Handheld Vacuum Sealer Machine, Seal Meal Saver, Portable Food Sealer |
|
| 6 | 90KPa Portable Vacuum Sealer Machine for Food, One-Touch Open Lid, Detachable & Easy to Clean, Vertical Placement Saves Space, Powerful Suction for Freezer Bags & Food Storage |
|
| 7 | Chef Preserve Compact Vacuum Sealer for Food (Vacuum Sealer Machine + 3 Glass Vacuum Containers + 30 Reusable Vacuum Bags) Powerful Handheld Vacuum Seal Machine, Seal Meal Saver, Portable Food Sealer |
|
| 8 | Vacuum Sealer Machine, Updated Powerful 95KPa Commercial Food Saver with Double Seal for 2X Strength, Built-in Cutter, Bags Storage & Easy-Lock Handle, Includes Free Bags (1 Roll + 10 Pre-cut) Black |
|
| 9 | Food Vacuum Sealer Machine, 75KPA Strong Suction, Dry/Wet Modes, 20 Vacuum Seal Bags for Food, Digital Countdown Timer, Compact Lightweight, Ideal for Home Kitchen Use |
|
| 10 | FoodSaver Vacuum Sealer Machine, Automatic Bag Detection, Sous Vide Friendly, with sealer bags, roll, handheld vacuum sealer, black |
|
Smart Tips and Common Pitfalls to Sidestep
Even with the best intentions, it’s easy to fall into common traps when using your vacuum sealer. Here are some insider tips and mistakes to avoid to keep your food perfectly preserved.
Pro-Tips for Peak Performance
- Blanching Vegetables: For many vegetables like broccoli, cauliflower, or green beans, blanching them briefly in boiling water before chilling and sealing can help maintain their vibrant color and texture, and prevent enzyme activity that leads to spoilage.
- Using Paper Towels for Moist Foods: If you’re sealing something slightly damp, like marinated chicken or fresh fish, place a small folded paper towel inside the bag, just below the sealing area. This will absorb any moisture that gets pulled up, ensuring a clean, strong seal.
- Double-Sealing Sharp Items: When vacuum sealing foods with sharp edges, like bones on a steak or rigid pasta, consider wrapping the sharp parts in a small piece of parchment paper or a paper towel before placing them in the bag. Then, apply a second seal just above the first for extra security against punctures.
- Allowing Cool-Down Time: If you’re sealing multiple bags back-to-back, give your vacuum sealer a few seconds to cool down between seals. This prevents the heating element from overheating and ensures consistent, effective seals.
- Choosing Quality Bags: Not all bags are created equal. Invest in high-quality, multi-ply, BPA-free vacuum sealer bags or rolls. They are designed to withstand freezing temperatures, prevent air leakage, and are often microwave-safe, adding to their versatility.
Mistakes to Avoid
- Overfilling Bags: We mentioned it before, but it bears repeating: trying to squeeze too much into a bag is a recipe for a failed seal. Always leave ample room.
- Ignoring User Manual Guidelines: Every vacuum sealer is slightly different. Take a few minutes to read your machine’s manual. It will provide specific instructions for optimal use and maintenance.
- Sealing Inappropriate Foods: While a vacuum sealer is amazing, not everything benefits from it.
- High-Oil Content Foods: Foods very high in oil, like raw nuts or certain baked goods, can go rancid even when vacuum sealed due to anaerobic degradation of fats. These are best kept in cool, dark places or frozen.
- Gas-Producing Vegetables: Fresh cruciferous vegetables (broccoli, cabbage, Brussels sprouts) and soft cheeses can release gases, causing bags to puff up. Blanching vegetables beforehand helps, but soft cheeses are generally not recommended for vacuum sealing.
- Powdery Foods Without a Barrier: Flour, sugar, or spices can be sucked into the machine, clogging it and leading to an ineffective seal. Place a coffee filter or paper towel over the opening of the bag before vacuuming to create a barrier.
- Improper Storage of Sealed Foods: Vacuum sealing extends shelf life, but it doesn’t eliminate the need for proper storage temperatures. Always refrigerate or freeze perishable vacuum-sealed foods. Dry goods like crackers or pasta can be stored in a cool, dark pantry.
As Dr. Eleanor Vance, a leading Food Science Innovator, often says, “A vacuum sealer is a powerful tool, but like any tool, understanding its nuances is key to unlocking its full potential and ensuring food safety and quality.”
Beyond Preservation: The Multifaceted Benefits of Vacuum Sealing
While extending shelf life is the primary draw, a vacuum sealer offers a wealth of additional advantages that transform your kitchen experience.
Extended Shelf Life & Waste Reduction
This is the big one! By removing oxygen, a vacuum sealer can make food last anywhere from three to five times longer than traditional storage methods. Fresh meats and fish can stay good in the freezer for years instead of months, while refrigerated items like cheese or deli meats maintain their freshness for weeks. This translates directly into significant savings on your grocery bill and a dramatic reduction in food waste, which is not only good for your wallet but also for the planet.
Freezer Burn Annihilator
Freezer burn is the arch-nemesis of frozen food, leaving ice crystals and dry, flavorless patches. It occurs when food is exposed to air in the freezer, causing moisture to evaporate. A vacuum sealer creates an impenetrable barrier, eliminating air contact and completely preventing freezer burn. Your frozen fruits, vegetables, and meats will emerge tasting just as good as the day you sealed them.
Cooking Enthusiast’s Ally
For those who love to cook, a vacuum sealer opens up new culinary horizons.
- Sous Vide: It’s indispensable for sous vide cooking, allowing you to perfectly seal food for precise, low-temperature water bath cooking, resulting in incredibly tender and flavorful dishes.
- Rapid Marination: The vacuum process opens up the pores of food, allowing marinades to penetrate deeper and faster. What might normally take hours can be achieved in just 20-30 minutes, perfect for those last-minute meal decisions.
Flavor & Nutrient Lock-In
Because air and moisture are kept out, vacuum-sealed foods retain their natural flavors, colors, and nutrients much better than conventionally stored items. Your vegetables stay vibrant, and your meats taste fresher, providing a noticeable difference in quality on your plate.
Space-Saving & Organization
Vacuum-sealed bags are compact and flexible, taking up significantly less space in your refrigerator, freezer, or pantry. This efficient packaging makes organizing your food much easier, allowing you to quickly see what you have and prevent items from getting lost in the back of the freezer.
Unexpected Uses and Advanced Applications of Your Vacuum Sealer
Your vacuum sealer isn’t just for food! It’s a versatile tool with many applications beyond the kitchen.
- Protecting Important Documents: Keep passports, birth certificates, or valuable photos safe from moisture, dust, and general wear and tear.
- Safeguarding Valuables: Protect silver from tarnishing, keep camping gear dry, or store emergency supplies.
- Rapid Infusions: Use the vacuum to quickly infuse oils with herbs, or make quick pickles and fermented foods. The pressure helps accelerate the infusion process.
- Resealing Snack Bags: Many external sealers can reseal original snack bags (like potato chip bags) without vacuuming, keeping your munchies fresh and crispy.
Frequently Asked Questions About Vacuum Sealers
Q: Can I vacuum seal liquids?
A: Yes, but it depends on the type of vacuum sealer. Chamber vacuum sealers are ideal for liquids as they remove air from the entire chamber, preventing liquids from being sucked out. For external vacuum sealers, it’s best to pre-freeze liquids into a solid or semi-solid state before sealing to avoid drawing them into the machine.
Q: What foods should NOT be vacuum sealed?
A: While most foods benefit, avoid vacuum sealing soft cheeses (like ricotta or blue cheese), fresh mushrooms, and garlic, as the anaerobic environment can promote the growth of harmful bacteria. Fresh, raw cruciferous vegetables (broccoli, cabbage) can release gases and cause bags to inflate, so it’s best to blanch them first. Foods with very high oil content like raw nuts may also go rancid faster due to anaerobic fat degradation.
Q: How long does vacuum sealed food last?
A: Vacuum sealing significantly extends shelf life. In the freezer, foods can last 2-3 years (vs. 6-12 months conventionally). In the refrigerator, perishable items can last 1-2 weeks (vs. 1-3 days). Dry goods in the pantry can last indefinitely if properly sealed and stored in a cool, dark place. Always refer to general food safety guidelines for specific items.
Q: Do I need special bags for my vacuum sealer?
A: Yes, generally you do. External vacuum sealers require embossed or textured bags to allow air to be pulled out through channels. Chamber vacuum sealers can use smoother, less expensive bags. Always use bags specifically designed for vacuum sealing to ensure proper function and safety.
Q: Is vacuum sealing really worth it?
A: Absolutely! The initial investment in a vacuum sealer is quickly recouped through reduced food waste and the ability to buy in bulk. Beyond the financial savings, the benefits of extended freshness, preventing freezer burn, easier meal prep, and enhanced cooking methods make it an invaluable tool for any home kitchen.
Conclusion: Embrace a Fresher Future with Your Vacuum Sealer
A vacuum sealer isn’t just another gadget; it’s a transformative tool that empowers you to take control of your food. By extending freshness, eliminating waste, and opening doors to new cooking techniques, it truly redefines how you interact with your groceries. Whether you’re a seasoned chef, a busy parent, or simply someone who appreciates fresh, delicious food, investing in a vacuum sealer will revolutionize your kitchen. So, take the plunge, master the art of vacuum sealing, and savor a future where freshness is always on the menu.