Ever opened your freezer only to find your precious steaks covered in a frosty white crust? Or perhaps tossed out forgotten leftovers, lamenting the wasted food and money? If these scenarios sound all too familiar, it’s time to discover the magic of a Home Vacuum Sealer. This unassuming kitchen appliance is rapidly becoming a must-have, transforming how we store food, reduce waste, and even elevate our culinary adventures right from the comfort of our homes.
At its core, a home vacuum sealer is a simple yet revolutionary device designed to extract air from a specialized bag or container before sealing it tightly. Why does this matter? Because oxygen is the primary culprit behind food spoilage, leading to mold growth, bacterial activity, and the dreaded freezer burn. By removing this invisible enemy, a home vacuum sealer dramatically extends the life of your food, preserving its freshness, flavor, and nutritional value far longer than conventional storage methods.
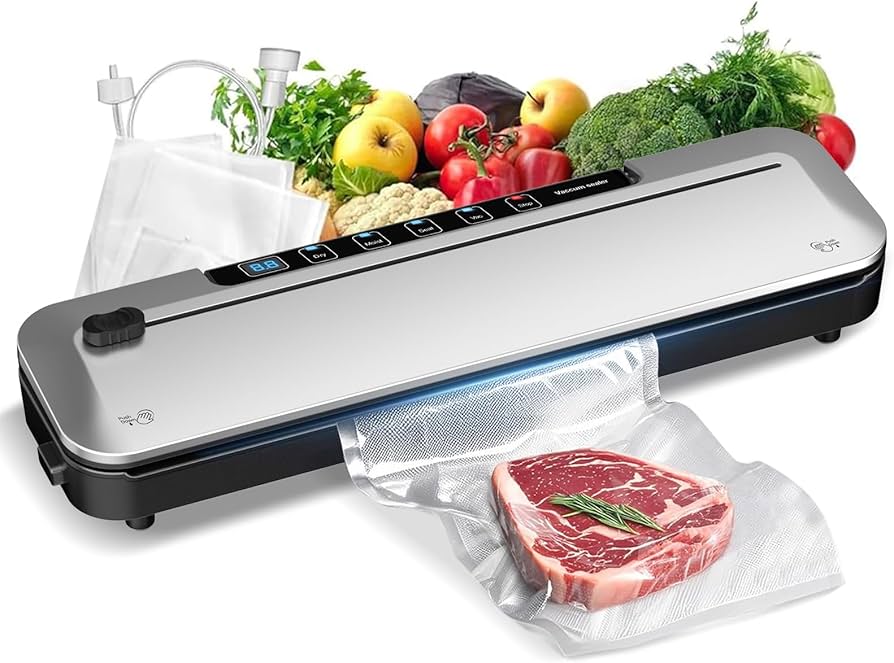
What is a Home Vacuum Sealer and Why Do You Need One?
Think of a home vacuum sealer as your personal freshness guardian. It doesn’t just seal a bag; it creates an airtight, oxygen-free environment that puts the brakes on spoilage. This simple act can rescue your groceries from an early demise and save you a significant amount of money in the long run.
For most households, the main goal is to keep food fresh for as long as possible. Whether you’re a keen gardener with a bountiful harvest, a savvy bulk shopper, or someone who loves to meal prep for the week, a home vacuum sealer becomes an indispensable tool. It combats the natural enemies of food—air, moisture, and freezer burn—allowing you to enjoy ingredients at their peak quality, months after you’ve sealed them away.
Unpacking the Different Types of Home Vacuum Sealers
Just like any kitchen gadget, home vacuum sealers come in various shapes and sizes, each designed to fit different needs and lifestyles. Understanding the distinctions will help you pick the perfect partner for your kitchen.
External Suction Sealers: Your Everyday Kitchen Workhorse
These are arguably the most common and recognizable types of home vacuum sealers. External suction sealers work by clamping down on a specially designed, textured (embossed) bag, sucking the air out through an opening, and then heat-sealing the bag shut. They are generally compact, countertop-friendly, and perfect for most solid foods.
Many popular models, like the Nesco Deluxe VS-12, often come equipped with convenient features such as a built-in roll storage and cutter, allowing you to create custom-sized bags on the fly. Advanced settings, including “moist” and “dry” food modes, adjust the sealing time for optimal results, while a “pulse” option gives you manual control over the vacuum pressure, preventing delicate items like berries or soft bread from being crushed.
Chamber Vacuum Sealers: The Professional Touch for Home Chefs
Stepping up in capability (and often price and size) are chamber vacuum sealers. Instead of just sucking air from the bag, these machines create a vacuum in an entire chamber. This means the pressure inside and outside the bag equalizes, making them ideal for sealing liquids, marinades, or very delicate foods without the risk of drawing moisture into the machine. While traditionally found in professional kitchens, smaller, more affordable chamber models, such as the Anova Precision Chamber Vacuum Sealer, are now available for serious home cooks. They typically use less expensive, smooth vacuum bags.
Handheld Vacuum Sealers: Compact Convenience
For those short on counter space or with occasional, lighter sealing needs, handheld vacuum sealers offer a fantastic, portable solution. These compact, often rechargeable devices work with specific containers or zipper-style bags that have a special port. They’re great for sealing smaller portions, protecting snacks, or extending the life of opened items like cheese or deli meats without the full power of a larger machine. The ZWILLING Fresh & Save is a prime example, often paired with reusable bags and glass containers.
Mastering Your Home Vacuum Sealer: A Step-by-Step Guide
Using a home vacuum sealer isn’t complicated, but a few key steps and tips can ensure you get a perfect seal every time, maximizing your food’s longevity.
Prepping Your Food for the Perfect Seal
Preparation is paramount for effective vacuum sealing. First, always ensure your food items are clean and as dry as possible, especially around the area where the bag will be sealed. Excess moisture can interfere with the heat seal.
Next, choose the right bag size, leaving at least 2-3 inches of space between the food and the open end of the bag for a good seal and potential re-sealing. “Leaving adequate space is critical,” notes culinary preservation expert Dr. Eleanor Vance. “It allows the machine to draw out all the air efficiently without pulling food particles into the sealing area, which can compromise the seal’s integrity.”
For certain vegetables like broccoli or green beans, a quick blanching process (briefly boiling, then plunging into ice water) before sealing can help preserve their vibrant color, texture, and nutrients. When dealing with liquids or very delicate foods like berries, fish fillets, or soft cheeses, consider flash freezing them on a baking sheet for an hour or two until solid. This prevents them from being crushed during the vacuum process and keeps liquids from being drawn into the sealer’s drip tray.
The Sealing Process: From Bag to Brilliance
Once your food is prepped:
- Plug in and Power On: Connect your home vacuum sealer and ensure it’s powered on. If your model has “dry” and “moist” settings, select the appropriate one.
- Position the Bag: Place the open end of the bag flat into the vacuum channel or over the sealing bar. Make sure there are no wrinkles, as even a small crease can lead to an incomplete seal.
- Close and Lock: Close the lid firmly. Many modern sealers have a latch or automatic locking mechanism. You might hear a “snap” indicating it’s securely closed.
- Start the Cycle: Some machines automatically begin the vacuum and seal cycle once closed, while others require you to press a “Vacuum & Seal” button. If your sealer has a “pulse” function, use it to manually control the suction for soft items.
- Wait and Remove: The machine will typically have indicator lights showing the vacuuming and sealing progress. Once the lights turn off, or the machine signals completion, unlock the lid and carefully remove your perfectly sealed package.
- Label: Always label your bag with the contents and the date sealed. This helps you keep track of your inventory and ensures you use food within its extended shelf life.
Pro Tips for Vacuum Sealing Success
- Custom Bags from Rolls: Use vacuum sealer rolls to create bags that are exactly the right size for your food, minimizing waste and maximizing space.
- Flat Freezing: For ground meats or casseroles, vacuum seal and then flatten the bag before freezing. This creates thin, stackable packages that defrost much faster.
- Jar Sealing: Many external vacuum sealers come with attachments to vacuum seal mason jars, perfect for preserving dry goods, sauces, or even delicate cookies.
- Re-seal Snacks: You can often use the heat-seal-only function to reseal opened bags of chips, cereals, or other pantry items, keeping them fresh without vacuuming.
- Cleanliness is Key: Regularly clean your sealing strip and drip tray to prevent food particles from interfering with future seals and to maintain hygiene.
The Transformative Benefits of Home Vacuum Sealing
Investing in a home vacuum sealer is about more than just a gadget; it’s about adopting a smarter, more efficient approach to food management.
Extend Food Freshness by 3-5X
The most immediate and impactful benefit is the dramatic extension of food freshness. By removing oxygen, vacuum sealing slows down the natural processes of decay, including oxidation and microbial growth. This means fresh meats, fish, fruits, and vegetables stay vibrant for weeks longer in the refrigerator and months longer in the freezer compared to traditional storage. Dry goods like coffee, nuts, and grains remain fresh and flavorful for significantly extended periods in the pantry.
Eliminate Freezer Burn Forever
Freezer burn is the nemesis of frozen food, leaving items dry, discolored, and flavorless. It occurs when food is exposed to air, causing moisture to escape and ice crystals to form. A home vacuum sealer creates an impenetrable barrier, preventing this moisture loss and preserving the texture and taste of your frozen items, making that bulk-bought chicken breast taste as fresh as the day you froze it.
Slash Food Waste and Save Money
Globally, food waste is a massive problem, and households contribute significantly. A vacuum sealer is a powerful tool in your fight against waste. By extending shelf life, you can utilize every last bit of your groceries, from garden harvests to supermarket bargains. This translates directly into substantial savings, as you throw away less and make smarter purchasing decisions, buying in bulk when sales hit.
Effortless Meal Prep and Portion Control
For busy individuals and families, a home vacuum sealer is a game-changer for meal prepping. You can cook large batches of food, portion them into individual servings, vacuum seal, and freeze. Then, simply grab a bag, thaw, and reheat for a quick, healthy meal. It also makes portion control incredibly easy, aiding in dietary management and healthy eating habits.
Marinate in Minutes, Not Hours
One of the lesser-known but incredibly convenient benefits is accelerated marination. The vacuum process opens up the pores of meats and vegetables, allowing marinades to penetrate deeply in just 20-30 minutes, achieving results that would otherwise take hours or even overnight. This is perfect for impromptu barbecues or when you’re short on time.
Elevate Your Sous Vide Cooking
For culinary enthusiasts, a vacuum sealer is an indispensable companion for sous vide cooking. This technique involves cooking food in a precisely temperature-controlled water bath. Vacuum-sealed bags create the perfect environment, ensuring even cooking, locking in all the natural juices, and allowing flavors to develop beautifully.
Maximize Fridge and Freezer Space
Vacuum-sealed bags are inherently flat and flexible, making them incredibly efficient for storage. Unlike bulky containers, they conform to the shape of your freezer or refrigerator, allowing you to stack items neatly and utilize every inch of space. This increased organization also makes it easier to see what you have, further reducing forgotten food.
Preserve Peak Flavor and Nutritional Value
Beyond preventing spoilage, vacuum sealing actively helps retain the intrinsic qualities of your food. By minimizing exposure to oxygen, it protects delicate flavors from fading and preserves essential vitamins and nutrients that would otherwise degrade over time. The difference in taste, especially for fresh produce and herbs, is often remarkable.
Beyond the Kitchen: Unexpected Uses for Your Vacuum Sealer
While primarily a kitchen tool, your home vacuum sealer has a surprising array of non-food applications:
- Protect Important Documents: Safeguard birth certificates, passports, or other vital papers from moisture, dust, and damage.
- Preserve Valuables: Keep silver from tarnishing, store jewelry, or protect photos and collectibles.
- Emergency Preparedness: Create waterproof, compact kits for camping, hiking, or emergency supplies, protecting matches, first-aid items, or extra clothing.
- Travel and Organization: Compress bulky clothes for more luggage space or organize small craft supplies and hardware.
Troubleshooting Common Home Vacuum Sealer Issues
Even the best appliances can have a hiccup. Here’s a quick guide to common home vacuum sealer problems and how to fix them:
Weak or Incomplete Seals
This is perhaps the most frustrating issue. If your bags aren’t sealing properly or lose their vacuum shortly after, check for:
- Wrinkles or Food Debris: Ensure the bag is perfectly flat on the sealing bar and that there are no crumbs, liquids, or food particles in the sealing area. Clean the heat strip with a soft cloth.
- Worn Seal Bar or Gasket: Over time, the sealing strip or rubber gaskets (which create the vacuum chamber) can wear out or become dirty. Inspect them for damage and clean or replace if necessary.
- Incorrect Settings: Make sure you’re using the appropriate setting (e.g., “moist” for wet foods) and that the sealing time isn’t too short. Some machines allow you to adjust this.
- Incompatible Bags: Always use bags designed for your specific type of vacuum sealer (embossed for external sealers, smooth for chamber models).
No Suction or Weak Vacuum
If your machine isn’t pulling air effectively:
- Blockages: Check the vacuum channel for any food particles or debris that might be obstructing airflow. Use a pipe cleaner if needed.
- Air Leaks: Ensure the lid is firmly closed and locked. Inspect the rubber gasket around the vacuum chamber for any damage or misalignment. A compromised gasket can prevent a proper vacuum from forming.
- Overheating: Continuous use can cause some machines to overheat and temporarily lose efficiency. Unplug it for 10-15 minutes to allow it to cool down and reset.
Liquid in the Machine
This is a common issue with external sealers when processing wet foods.
- Solution: As mentioned earlier, partially freeze liquids or very moist foods until they are slushy or semi-solid before vacuum sealing. Alternatively, consider a chamber vacuum sealer, which is designed to handle liquids without issue.
Choosing the Right Home Vacuum Sealer for You
With a variety of options available, selecting the perfect home vacuum sealer comes down to your individual needs. Consider:
- Your Cooking Style: Do you primarily seal solid foods, or do you need to handle liquids and delicate items regularly? This will guide your choice between an external suction or chamber sealer.
- Kitchen Space: External sealers are typically more compact, while chamber models require more dedicated counter space. Handheld options are great for small kitchens.
- Features: Look for helpful additions like built-in bag storage and cutters, multiple sealing modes (dry/moist), and pulse functions for versatility.
- Durability and Reviews: Check customer reviews and brand reputation for reliability and longevity. A good quality sealer should be an investment that lasts.
- Budget: Prices vary widely, so set a budget that aligns with your anticipated usage and desired features.
Frequently Asked Questions About Home Vacuum Sealers
What foods shouldn’t be vacuum sealed?
While most foods benefit from vacuum sealing, certain items are best avoided. Fresh garlic and onions can produce anaerobic bacteria when sealed, leading to botulism. Freshly cooked mushrooms can also spoil faster. Soft, unpasteurized cheeses, raw cruciferous vegetables like broccoli and cauliflower (unless blanched), and whole, fresh apples (they release ethylene gas) are also generally not recommended for direct vacuum sealing.
How long does vacuum sealed food last?
The shelf life extension varies by food type and storage method (pantry, fridge, freezer). Generally, vacuum sealing extends refrigeration life by 2-3 times (e.g., fresh meat from a few days to a week or two) and freezer life by 3-5 times (e.g., frozen meat from 6-12 months to 2-3 years) compared to conventional methods. Dry goods can last for years.
Can I use regular Ziploc bags with my vacuum sealer?
No, most home vacuum sealers (external suction models) require specially designed embossed vacuum sealer bags. These bags have a textured surface that allows air to be effectively drawn out. Regular Ziploc bags are too thin and smooth to create a reliable vacuum seal, although some handheld sealers work with specific zipper bags or containers. Chamber sealers, however, can use smooth, less expensive bags.
Is a home vacuum sealer worth the investment?
Absolutely! The initial cost of a home vacuum sealer is quickly recouped through reduced food waste and savings from bulk purchasing. Beyond the financial benefits, the convenience of meal prepping, extended freshness, and enhanced culinary capabilities (like sous vide and quick marinating) make it a highly valuable addition to any kitchen.
How often should I clean my vacuum sealer?
It’s recommended to wipe down the sealing bar and drip tray after each use, especially if sealing moist foods, to prevent residue buildup. A more thorough cleaning of gaskets and channels should be done regularly, perhaps monthly or every few weeks, depending on usage, to ensure optimal performance and hygiene.
What is the difference between an external and chamber sealer?
An external sealer works by drawing air directly out of a bag, clamping it on the outside. It requires embossed bags. A chamber sealer, on the other hand, creates a vacuum within its entire chamber, equalizing pressure both inside and outside the bag, making it ideal for liquids and delicate items, and it can use smooth, less expensive bags. Chamber sealers are generally larger and more powerful.
Seal in Freshness, Savor the Savings
A home vacuum sealer isn’t just a kitchen gadget; it’s a lifestyle upgrade. By understanding how these devices work, the various types available, and how to use them effectively, you can unlock a world of benefits: from significantly extending the freshness of your food and eliminating wasteful freezer burn to simplifying meal prep and saving money. Take the leap, embrace the power of vacuum sealing, and transform the way you interact with your food, ensuring every meal is as fresh and flavorful as possible.